

how to add slide numbers in powerpoint
In this article, you'll learn how to add slide numbers in PowerPoint so that they properly show up (like they are supposed to).
And I've included an advanced troubleshooting section at the end if you have one of the rare slide number cases that requires a bit more effort to solve.
When it comes to adding slide numbers to your PowerPoint presentations, the last thing you want to do is frustrating add to each of your slides.
This is a classic 101 PowerPoint mistake (that you don't want to make).
That's because not only will it take you forever to manually add them if something changes in the future (which always happens) it will then take you forever to fix them again. Instead, just like any common element you want to have on ALL of your slides, you want to use your Slide Master to update and manage them, as explained below.
ARTICLE GIVEAWAY: Click here to download a printable PDF of how to add slide numbers to keep by your desk.
[Watch] How to add slide numbers to PowerPoint
Adding slide numbers in PowerPoint is one of those things that should be simple and easy (like it is in Microsoft Word)…but it's not.
And just so we are on the same page, in this article you can use the term slide number and page number interchangeably. They are the same thing in this case.
While a lot of people can "properly" add them to the PowerPointSlide Master, they still can't get them to properly show up in theNormal View.
And if you work in the professional services industry, this is something you'll want to get right! The last thing you want to do is torpedo the overall quality of your presentation simply because you can't get your slides properly numbered.
So before you mark your presentation as final or convert your presentation into the PDF file format (click here for details), follow the steps below.
1. Navigate to your Slide Master

To navigate to the Slide Master view in PowerPoint, simply:
- Navigate to the View tab in your Ribbon
- Select the Slide Master command
If you frequently need to use your Slide Master, you can use the Shift + Normal icon shortcut to jump to the slide master. To learn this Slide Master jump shortcut (and more), read our shortcut guide here.
2. Navigate to the Parent Slide
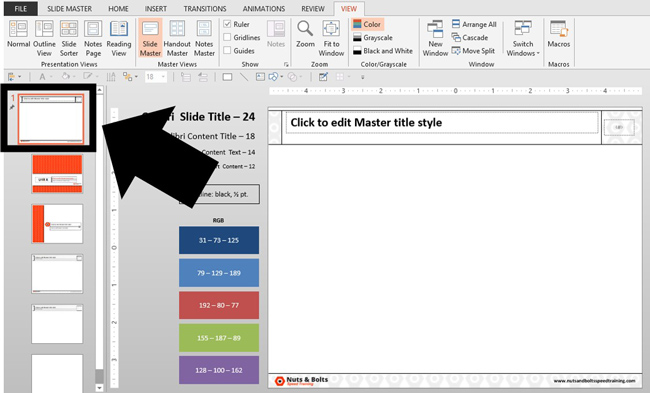
In the Slide Master view, navigate to the Parent slide on the top left. This will be the first and largest the slide listed on the left side of your screen.
3. Open the Master Layout dialog box

To open the Master Layout dialog box in PowerPoint, simply:
- Navigate to the Slide Master tab in your Ribbon
- Click Master Layout to open the dialog box
The Master Layout dialog box is where you set the Title, Text, Date, Slide number, and Footer for your PowerPoint presentation. To expand your knowledge and learn how to create a template in PowerPoint, read our guide here.
NOTE: The Slide Master tab only shows up in your Ribbon in the Slide Masterview. If you don't see the Slide Master tab, it means you are not in the Slide Master view.
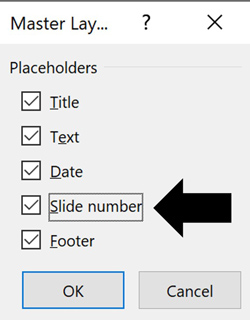
4. Select Slide Number
In the Master Layout dialog box, make sure you have a check mark next to Slide number. You can additionally add the Title, Text, Date and/or Footer here if you like.
After you select which elements you want to appear on your slides, click OK .
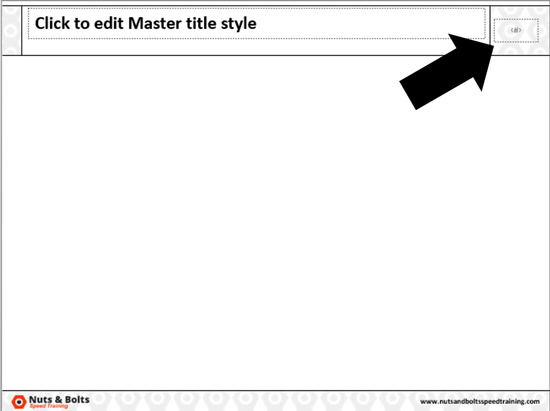
5. Place and format your Slide Number
With the slide number added to your Master Slide, you can now format and/or place it wherever you want. In this case, I've placed mine in the upper right-hand corner of my slide.
Where you place it on your Parent Slide determines where the numbers show up (by default) on all of your Child Slides. In the below picture, you can see I placed my slide number in the upper right hand corner of my slide.
Note: By default, your slide numbers will populate to all of your Child Slides (the little slides in the Slide Master view) in the same position as your Parent Slide layout. If they do not, you will need to cycle through the Child Slide layouts and delete the page numbers individually, and then click the Footers icon in your Ribbon.
To expand your knowledge of the Parent Slide and Child Slide layouts in PowerPoint, and how to properly set up and use them, read our guide here.
6. Close out of the Slide Master view

With your slide number properly set and formatted, you can then close the Slide Master View.
To do that, simply select the Close Master View command in the Slide Master tab in your ribbon.
7. Open the Slide Number dialog box

Back in the Normal View of your PowerPoint presentation, you are now ready to insert your slide numbers into your presentation.
- Navigate to the Insert tab
- Select the Slide Number command
You can alternatively use the Alt + Shift + D keyboard shortcut to open the Header and Footer dialog box. Regardless of how you get here, this is the proper place to manage the Date and time, slide numbers, and footers within your presentation.
To learn more PowerPoint keyboard shortcuts that will save you time, read our guide here.
8. Apply your Slide Number
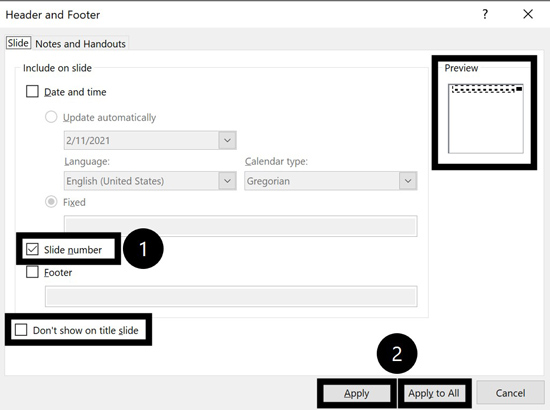
Within the Header and Footer dialog box, make sure there is a checkmark next to the Slide number.
With it selected, you get a preview of where your slide numbers will appear in the upper right-hand corner of the dialog box. After that, select either:
- Apply, applies your slide number to the individual slide you are working on.
- Apply to All, applies slide numbers to all of the slides within your presentation (assuming that each of the Child Slide layouts has your slid number on it).
Assuming you want to apply the change to all of your slides, click Apply to All and you are done. As you can see in the picture below, my slides now have page numbers on them (exactly where I placed them on my Slide Master).
Note: In the lower left-hand corner of the Header and Footer dialog box, you have the option toDon't show on title slide. Selecting this option and clicking apply removes the slide number, date and time, and footer from your title slide.
This is great when you have a cover page for your presentation that needs to be clean. Just be aware, that the title slide in PowerPoint is defined as the first slide in your Slide Master beneath your Parent Slide.
Final Slide Number Thoughts
So that is how to add slide numbers in PowerPoint, and some of the issues you will face.
Also, keep in mind that you can use the Header and Footer dialog box to quickly remove all of the slide numbers from your presentation. Simply unselect the Slide number option, and click Apply to All and PowerPoint will automatically remove them all from your presentation.
While we all wish that adding page numbers in PowerPoint was as easy as it is in Word, that's why you are paid the big PowerPoint bucks.
If you enjoyed this slide number tutorial and want to take your PowerPoint skills to the next level, check out our online training courses and other PowerPoint tutorials here.
how to add slide numbers in powerpoint
Source: https://nutsandboltsspeedtraining.com/powerpoint-tutorials/how-to-add-slide-numbers-in-powerpoint/
Posted by: mcdanielpridn1990.blogspot.com
0 Response to "how to add slide numbers in powerpoint"
Post a Comment